01 December 2020

Pcap Header

Format pcap file 


Dalam Global Header, ada timzone info.

Dalam Packet Header ada timestamp.

Dalam Packet Data ada network traffic yg lalu (dihantar/diterima) NIC tersebut.


Packet vs Frame

Frame is refer to data link layer
Packet refer to network layer


Ref:

- https://www.elvidence.com.au/understanding-time-stamps-in-packet-capture-data-pcap-files/


30 November 2020

winlogbeat -> logstash -> elastic

 good tutorial here


Creating Template for elastic index

 Elastic will auto create index when it receive request from client.

If the index state by the client not exist, it will auto create it base on template.


List of available template:

    GET /_template


To put new template:

PUT /_template/supertimeline
{
    "index_patterns": "st-*",
    "settings": {
        "index" : {
        "refresh_interval": "10s" ,
        "number_of_shards" : 20,
        "number_of_replicas" : 1
        }
    }
}

Edit Pcap guna Scapy

 Scapy adalah library python yang boleh digunakan untuk edit packet dalam dalam fail pcap.


Cara nak tukar timestamp pada setiap packet


from scapy.all import *

pkts = rdpcap(infile)
for p in pkts:
    p.time = p.time + tukar
    pmod=p
    cooked.append(pmod)

wrpcap("out.pcap", cooked) 


Cara nak tukar mac address

mac_asal = a
mac_baru = b

if ARP in p:
    if p[ARP].hwsrc == mac_asal
           p[ARP].hwsrc = mac_baru


11 November 2020

Windows command Line

enable/disable firewall

netsh advfirewall set  currentprofile state off

netsh advfirewall set  allprofiles state off


enable file sharing:

netsh advfirewall firewall set rule group="File and Printer Sharing" new enable=Yes, and hit Enter.


create share folder:

net share Public=s:\Public /GRANT:Everyone,FULL
net share share_folder_name /delete


map share folder:
net use Z: \\computer_name\share_name /PERSISTENT:YES
net use  Z: /delete


Copy folder recursive:
Xcopy C:\test D:\test /E /H /C /I
  • /E – Copy subdirectories, including any empty ones.

  • /H - Copy files with hidden and system file attributes

  • /C - Continue copying even if an error occurs.

  • /I - If in doubt, always assume the destination is a folder. e.g. when the destination does not exist.


  • sd


22 September 2020

ssh account for upload files only (SSH)

SFTP Setup:
/etc/ssh/sshd_config:

    Subsystem sftp internal-sftp
    Match Group sftpusers
    PasswordAuthentication yes
    ChrootDirectory /srv/sftponly
    AllowTCPForwarding no
    X11Forwarding no
    ForceCommand internal-sftp

Adding the sftp group:
    groupadd sftpusers

Creating the only account for SFTP Access
    useradd -d /srv/sftponly -g sftpusers -s /bin/false sftpuser
    passwd sftpuser

Restart openssh:
    /etc/init.d/ssh restart

Setting Permission for the directory
chown root:root /srv ; chown root:root /srv/sftponly ; chmod 755 /srv ; chmod 755 /srv/sftponly

Making a Public Directory:
mkdir /srv/sftponly/public
chown sftpuser:sftpusers /srv/sftponly/public/
chmod 333 /srv/sftponly/public/
ls -ltd
d-wx-wx-wx 2 sftpuser sftpusers 4096 Oct 15 14:51 /srv/sftponly/public/


 ref

https://www.unix.com/unix-for-advanced-and-expert-users/238265-sftp-resticting-only-uploading-file.html

21 September 2020

Install winlogbeat

# Test Winlogbeat Configuration
winlogbeat.exe test config -c winlogbeat.yml -e    


If you want to send to LOGSTASH instead directly to elastic:
...
...

#output.elasticsearch:
# Array of hosts to connect to.
# hosts: ["localhost:9200"]

...
...

output.logstash:
# The Logstash hosts
hosts: ["localhost:5044"]

...
...


Install/Uninstall Service:
# Install Service
.\install-service-winlogbeat.ps1

# Uninstall Service
.\uninstall-service-winlogbeat.ps1

Join or Leave AD domain via command line

Join Domain:

netdom join %computername% /domain:vdom /reboot /UserD:user /PasswordD:* /Force


Leave Domain:

netdom remove %computername% /domain:vdom /reboot /UserD:user /PasswordD:* /Force


Ref 

 - https://www.dell.com/support/article/en-my/how10118/joining-and-removing-a-server-from-an-active-directory-domain-using-netdom-exe?lang=en

- https://serverfault.com/questions/412263/command-to-remove-computer-from-non-existant-domain


17 September 2020

Logstash: custome index template

1) create template json

vim elasticsearch-template_v00005.json
{
        "index_patterns": "logstash_v00005-*",
        "settings": {
                "index" : {
                        "refresh_interval": "10s" ,
                        "number_of_shards" : 1,
                        "number_of_replicas" : 0
                }
       }
} 


2) import template and check

$ curl -XPUT -H 'Content-Type: application/json' 'http://localhost:9200/_template/logstash_v00005?pretty' -d@elasticsearch-template_v00005.json
{
  "acknowledged" : true
}

and check..

$ curl -XGET 'http://localhost:9200/_template/logstash_v00005?pretty'
{
  "logstash_v00005" : {
    "order" : 0,
    "index_patterns" : [
      "logstash_v00005-*"
    ],
    "settings" : {
      "index" : {
        "number_of_shards" : "1",
        "number_of_replicas" : "0",
        "refresh_interval" : "10s"
      }
    },
    "mappings" : { },
    "aliases" : { }
  }
}


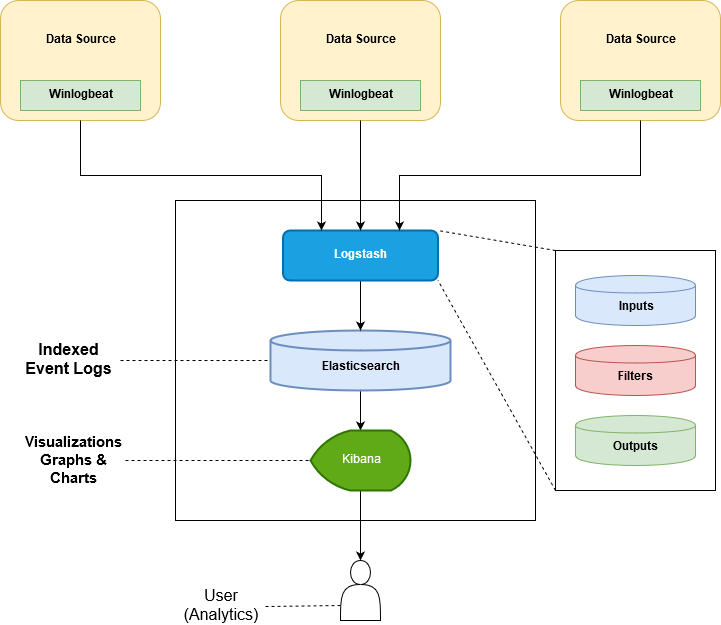
3) set logstash output config

cat /etc/logstash/conf.d/98-elasticsearch-output.conf
output {
  elasticsearch {
    hosts => ["localhost:9200"]
    manage_template => true
    template_overwrite => true

    template => '/etc/logstash/elasticsearch-template_v00005.json'
    template_name => 'logstash_v00005'
    index => 'logstash_v00005-%{+YYYY.MM.dd}'
  }
  stdout { codec => rubydebug }
}


last, dont forget to restart your logstash


ref  https://github.com/elastic/logstash/issues/10687

09 September 2020

08 September 2020

Windows Share folder

1) net share

2) $ at the end(eg: C$):
     - is an administrative share.
     - hidden,
     - need membership in the local Administrators security group.


3) fsmgmt.msc


4) Default sharre
    - DriveLetters$
    - ADMIN$   (c:\Windows)
    - IPC$
    - NETLOGON   (on DC only)
   - SYSVOL  (on DC only)


5) EVENT LOG

a) 5142 - success create file share

b) 4657 - registry value was modified
     \REGISTRY\MACHINE\SYSTEM\ControlSet001\Services\LanmanServer\Shares


c) 5144 - success delete file Share


d) 5140 - success File_share access
     - one time persession. windows10 default timeout is 15 minutes.

e) 5145 - successfull file_share file/folder operations
     -  need to enable 'Objec_Access - > Detailed File Share' auditing sub-category  


03 September 2020

Sandbox: vmImage preparation

Sandbox normally will need a clean snapshot of vmImage.

If you are using qemu/kvm, this is how to create snapshot


1) run the guest, make sure evertyhing works
    - network ok 
    - - - can go to internet, 
    - - -  can communicate to sandbox manager(can ping to sandbox mgr)
    - - -  sandbox mgr can ping to vmImage
    - agent already running


2) create snapshot:
     $ virsh snapshot-create-as --domain <vm_image>  --name <snapshot_name>

3) to verified your snapshot is working
   -  shutdown the guest
          $  virsh shutdown <vm_image>
           or  virsh destroy <vm_image>

   -  revert to snapshot
           $ virsh snapshot-revert <vm_image> <snapshot_name>


01 September 2020

Elastic check timeout Task

 Sometime task take a very long time to complete such as reindex a big index. This will cause a timeout.

Actually the task is not terminate, but still continue on the background. How to check/list these background process?


1) list all tasks

GET _tasks?actions=indices*reindex
{
"query": {
"match_all": {}
   }
}

This will result such as this:

      "tasks" : {
        "kxXru-l2R92uy63iVzUYww:2365783289" : {
          "node" : "kxXru-l2R92uy63iVzUYww",
          "id" : 2365783289,
          "type" : "transport",
          "action" : "indices:data/write/reindex",
          "start_time_in_millis" : 1598930492885,
          "running_time_in_nanos" : 35909231518,
          "cancellable" : true,
          "headers" : { }
        }
      }


2) see details task
GET _tasks/kxXru-l2R92uy63iVzUYww:2365783289
  "query": {
    "match_all": {}
  }
}

This will resulted:
{
  "completed" : false,
  "task" : {
    "node" : "kxXru-l2R92uy63iVzUYww",
    "id" : 2365783289,
    "type" : "transport",
    "action" : "indices:data/write/reindex",
    "status" : {
      "total" : 346450,
      "updated" : 0,
      "created" : 262000,
      "deleted" : 0,
      "batches" : 263,
      "version_conflicts" : 0,
      "noops" : 0,
      "retries" : {
        "bulk" : 0,
        "search" : 0
      },
      "throttled_millis" : 0,
      "requests_per_second" : -1.0,
      "throttled_until_millis" : 0
    },
    "description" : "reindex from [my-event-b086cd38-fde3-4d0b-8403-154942d42a9f-2020-07-*] to [my-event-b086cd38-fde3-4d0b-8403-154942d42a9f-2020-07][_doc]",
    "start_time_in_millis" : 1598930492885,
    "running_time_in_nanos" : 261954757922,
    "cancellable" : true,
    "headers" : { }
  }
}

25 August 2020

Good read to understand relation of Virtualization - Hypervisor - KVM -QEMU


- KVM is linux kernel modul. No gui. Only provide CPU and RAM, not hd, network etc.

- Qemu is an emulator of varied cpu. It also has features to use KVM which will boost performance compare to other emulated cpu type.

-Libvirt as wrapper to start QEMU with the right options.


For more, refer this good explanation:

 https://superuser.com/questions/1490188/what-is-the-difference-and-relationship-between-kvm-virt-manager-qemu-and-libv

Qemu/kvm/virsh Snapshot

 create snapshot:

sudo virsh snapshot-create-as <domain> <snapshot-name>


This will create xml file in /var/lib/libvirt/qemu/snapshot/<domain>/<snapshot-name>.xml


Normally for snapshot, will have Copy-On-Write. Means anything changes will be save somewhere else instead of main disk image.


But for qcow2, little bit different. The changes still will be store on the main disk image.


To list snapshot:

# qemu-img snapshot -l /var/lib/libvirt/qemu/centos7-server.qcow2
Snapshot list:
ID        TAG                 VM SIZE                DATE       VM CLOCK
1         live_snapshot1         2.3G 2020-08-25 12:44:09   00:32:40.190


https://unix.stackexchange.com/questions/570414/understanding-how-libvirt-snapshots-are-stored

24 August 2020

Proxmox Nested Virtualization

 How to install qemu in a proxmox guest.

(Baremetal has proxmox, guest will has qemu(to install another guest on top of qemu)

Qemu/KVM is a hypervisor, same also as proxmox.


1) Enable Nested virtualization on proxmox

a)- check is nested enabled:

cat /sys/module/kvm_intel/parameters/nested
Y  - yes
N - not enabled


b)- if not enable, 
# echo "options kvm-intel nested=Y" > /etc/modprobe.d/kvm-intel.conf

c)- then reboot and reload
modprobe -r kvm_intel
modprobe kvm_intel

then check again if nested succesfully enable (a)


2)- Create a guest(of proxmox) with 'CPU Type': host

a) to verify guest support hardware virtualization:
egrep '(vmx|svm)' --color=always /proc/cpuinfo


ref:  https://pve.proxmox.com/wiki/Nested_Virtualization


KVM Qemu virsh

-list storage(pool)

 virsh pool-list


-list volume

virsh vol-list __poolName__


-list vm

# virsh list --all


ref:   https://docs.deistercloud.com/content/Tutorials.100/Linux.80/KVM%20virtualization.40/KVM%20VirSH%20Command.xml?embedded=true


good one: https://serverfault.com/questions/434064/correct-way-to-move-kvm-vm/434070#434070

21 August 2020

pip install package on previous version

 1- to list available package:

   pip install thepackage==randomwords

(attemp to install unexist package, will return error, and pip will display available package)


2- install certain version of package

   pip install libvirt-python==5.10.0

19 August 2020

Laravel - Redis - Que - Failed Job

 Laravel has capability to send task/job to worker. Means when the request coming from client/browser, certain task/code can be pass to be process later by worker. This will enable laravel to complete the http response faster, without need to wait for that certain code to finish process.


In laravel, this can be done by creating a class that implements ShoudQueue.

class ProcessPodcast implements ShouldQueue

ProcessPodcast::dispatch()   will tell Laravel to queue the job in redis(this is one of the option), then worker will retrieve the job from redis.

If there is error during the job execution, it will be put in table failed_jobs.

We can request Laravel to resubmit this fail jobs to redis again by:
php artisan queue:retry all


To check jobs list in redis:

$ redis-cli
127.0.0.1:6379> keys *
From figure above, we can tell the pending jobs in redis is 131,093.


To check failed jobs:
mysql> select (*) from failed_jobs;


17 August 2020

Domain Fronting Attack

As want to connect to www.google.co.uk, instead connect to www.google.com.au

$ curl -H "host: www.google.com.au" www.google.co.uk


Fakely connect to baik.com, but actually connect to jahat.com, This can be done if baik.com use same CDN as jahat.com

$ curl -H "host: jahat.com" https://baik.com

11 August 2020

Using custom CA in python virtual environment

 You have installed your custom CA in your client machine. Using curl, everthing is fine(refer here).

But since your python script  use  virtenv, your script cannot see the custom CA.


This is because python virtualenv looking the certifcates in different place than the normal python 

$ python -c "import requests; print ( requests.certs.where() )"
/etc/ssl/certs/ca-certificates.crt

$ (.venv) python -c "import requests; print (requests.certs.where())" 
.../.venv/lib/python3.6/site-packages/certifi-2020.6.20-py3.6.egg/certifi/cacert.pem


Solution, is to import the custom CA to the virtual Environtment.

openssl x509 -in $specific_ca.crt -text >> $virtualenv/lib/python3.6/site-packages/certifi-2020.6.20-py3.6.egg/certifi/cacert.pem


ref:

https://stackoverflow.com/questions/34931378/certificate-verification-when-using-virtual-environments

06 August 2020

Add custom CA to ubuntu

tested with ubuntu 18:04


1) sudo apt-get install ca-certificates


2) copy CA certificate to local:
      sudo cp CERTIFICATE.crt /usr/local/share/ca-certificates/


If your certificate in PEM format, need to convert to .crt using this command:
openssl x509 -outform der -in CERTIFICATE.pem -out CERTIFICATE.crt

3) update certificate
  sudo update-ca-certificates


ref:  


28 July 2020

LVM, add new partition to extend lv(logical volume)

Concept:

- has 3 logical layer
-- pv(physical volume)
       partition to be use for LVM
-- gv(group volume)
       group of partition(pv) seen as 1 big harddisk. One system/OS could have multiple gv
-- lv(logical volume)
       lv to gv, is as partition to harddisk


To extend partition(lvm), by adding new partition to be part of the lvm

1- create partition on new drive
     

2- register the partition as pv
      pvcreate /dev/sdb1
      pvdisplay


3- add the pv  to be a member of on of the gv
       use vgdisplay to check name existing volume group(vg)

       vgextend _name_of_volume_group_ /dev/sdb1


4-  extend the current lvm to utilize the free space in gv
       lvm to gv is as a partition to harddisk. At this stage, our gv size has increase. So we have oppurtunity to increase size of the lvm base on free size on the gv.

       use lvdisplay to check LV_path

      lvextend -l +100%FREE __LV_path__
        or
       lvextend -L +100G __LV_path__


5- extend filesystem
       resize2fs /dev/mapper/__LV_Name__


ref:
1- https://www.krenger.ch/blog/linux-lvm-how-to-adding-a-new-partition/

23 July 2020

redis 101


list all keys
redis-cli
> keys *


count item in keys
> llen key_name


> type key


if type is hash, then use hgetall to view
>hgetall key


19 July 2020

force client close connection tcp reset

I have ssh client connect to my server for reverse tunnel.

But sometime the connection idle(I cant ssh to the tunnel(no respond)).
So need to find a way to force client close the connection. (my script on the client will reconnect everytime connection closed)


If I just kill the process on the server, by looking the process id via 'netstat -punat', the process will terminated. But the client does not re-initiate the connection. I believe, on the client side, the process still somehow believe the connection is still on going.
Thus, this not is my attempt to find a solution how to safely force the client to close the connection, so that my script will re-connect back to the server.


First suggestion:
On linux kernel >= 4.9 you can use the ss command from iproute2 with key -K
ss -K dst 192.168.1.214 dport = 49029

  the kernel have to be compiled with CONFIG_INET_DIAG_DESTROY option enabled.
Unfortunately this method is not workable on my server, maybe the kernel no compiled with those features


2nd approach:
Using killcx
On centos:
yum --enablerepo=extras install epel-release
yum install perl-Net-IP

yum install cpanspec


ref: https://unix.stackexchange.com/questions/71940/killing-tcp-connection-in-linux

ref 2: https://superuser.com/questions/127863/manually-closing-a-port-from-commandline/668155#668155

ref3: https://www.tecmint.com/install-perl-modules-using-cpan-on-centos/

git tag


Get all tags from remote repo
$ git fetch --all --tags
List all tags:
$git tag


Checkout tag
$ git checkout tags/_tag-name_ -b __branch-name__

do some changess here... or merge with latest branch
$ git merge branch_with_new_features

Create new tag
$ git tag vX.x

Push to remote Repo
$ git push origin vX.x 


01 July 2020

auto mount smb folder on boot

1- manual mount:

sudo mount -t cifs -o username=pakAbu,password=takselamat //1.1.1.1/sharefolder  /mnt/mount_disini/


2- mount on boot

/etc/fstab:

//1.1.1.1/sharefolder /mnt/mount_disini cifs username=pakAbu,password=takselamat 0 0


3- use third file to store credential

/etc/mywinlogin.txt:
username=pakAbu
password=takselamat
domain=WORKGROUP

/etc/fstab:
//1.1.1.1/sharefolder /mnt/mount_disini cifs credential=/etc/mywinlogin.txt 0 0


This will make folder /mnt/mount_disini own by user root, and group root.


4- to change mount dir to normal user
//1.1.1.1/sharefolder /mnt/mount_disini cifs credential=/etc/mywinlogin.txt,uid=1001,guid=1001 0 0

Notice parameter uid and gid. uid number refer to /etc/passwd. gid refer to /etc/group


07 June 2020

ssh legacy option

some older ssh server only support limited key exchange algorithm.

When you get this error:
no matching key exchange method found. Their offer: diffie-hellman-group-exchange-sha1,diffie-hellman-group1-sha1


Use this option :
-oKexAlgorithms=+diffie-hellman-group1-sha1


eg:
ssh -oKexAlgorithms=+diffie-hellman-group1-sha1 user@legacyhost


or put this in your .ssh/config file:
Host myhost.example.org
 KexAlgorithms +diffie-hellman-group1-sha1


18 May 2020

elastic: how many shard should I have

Aim for shard sizes between 10GB and 50GBedit

ref:    https://www.elastic.co/guide/en/elasticsearch/reference/current/size-your-shards.html


To check shard size:
GET _cat/shards?v=true&h=index,prirep,shard,store&s=prirep,store&bytes=gb&index=index_name*
#the store field should be in GB unit


-----------------------old-------------------------

settings": {
    "index": {
      "number_of_shards": "1",
      "number_of_replicas": "1",


number _of_shard: how many shard per index
number_of_replicas: how many clone for each shard


#notes to have different index for each day, might be too much(max shard per ES node is 1000.)
You should try separate the index per month, (and increase number_of_shards).

How much is too many shard? Basically number of shard is ~ number of total CPU core across your cluster.(or you might one to double it if you have Hyper-Threading). More than this, it might not help you to go any quicker in searching data.

#some say it would be ok if your shard size between 2GB - 8GB


ref:  https://qbox.io/blog/optimizing-elasticsearch-how-many-shards-per-index

17 May 2020

filebeat -> logstash -> rabbitmq - > logstash -> elastic

1) filebeat - logstash
  normal case, you can google it

2) logstash - rabbitmq
  https://stackoverflow.com/questions/23207812/logstash-rabbitmq-output-never-posts-to-exchange
output { 
   rabbitmq {
      codec => plain
      host => localhost
      exchange => yomtvraps
      exchange_type => direct
      key => yomtvraps

      # these are defaults but you never know...
      durable => true
      port => 5672
      user => "guest"
      password => "guest"
   }
}


3) rabbitmq -logstash
  https://discuss.elastic.co/t/rabbitmq-as-logstash-input/95756
input { rabbitmq { host => "localhost" port => 15672 heartbeat => 30 durable => true exchange => "logging_queue" exchange_type => "logging_queue" } } output { elasticsearch { hosts => "localhost:9200" } stdout {} }


4) logstash - elastic
   normal case, please google

good tmux tutorial for beginner

https://www.hamvocke.com/blog/a-quick-and-easy-guide-to-tmux/


https://linuxize.com/post/getting-started-with-tmux/

Below are some most common commands for managing Tmux windows and panes:
  • Ctrl+b c Create a new window (with shell)
  • Ctrl+b w Choose window from a list
  • Ctrl+b 0 Switch to window 0 (by number )
  • Ctrl+b , Rename the current window
  • Ctrl+b % Split current pane horizontally into two panes
  • Ctrl+b " Split current pane vertically into two panes
  • Ctrl+b o Go to the next pane
  • Ctrl+b ; Toggle between the current and previous pane
  • Ctrl+b x Close the current pane

16 May 2020

elastic roles privileges


To write/ingest indices,  user must have role with:
- cluster: "manage_index_templates", "monitor", "manage_ilm"
- indices privileges: "write","create","delete","create_index","manage","manage_ilm"


To read the indices, minumum priveleges:
- "read","view_index_metadata"


15 May 2020

setup Proxmox cluster, and ceph storage to achieve hyperconvergenc

combining multiple condition fo refine your searching in elasticsearch

a good example to learn

Bool Query fields:
- must    (and)
- must_not
- should  (or)
- filter


example 1 :(field_1 = "mana" AND field_2 = "mari")
{ "query" : { "bool" : { "must": [{ "match": { "field_1": "mana" } }, { "match": { "field_2": "mari" } }] } } }


example 2 :(field_1 != "mana"  AND field_2 != "mari")
{ "query" : { "bool" : { "must_not": [{ "match": { "field_1": "mana" } }, { "match": { "field_2": "mari" } }] } } }


example 3 : (field_1 = "mana" OR field_2 = "mari")
{ "query" : { "bool" : { "should": [
{ "match": { "field_1": "mana" } },
{
"match": { "field_2": "mari" } }] } } }


example 4 : (field_1 = "mana")
{
  "query": {
    "bool" : {
      "filter"
: {          "term": {          "field_1": "mana"         }       }
    }
  }
}
### filter is much less expensive, as it will NOT have scoring


example 5: to combine filter and others:
(( field_1 = "mana" and field_2 = "mari") and field_3 = "arah")
{ "query" : { "bool" : { "must": [{ "match": { "field_1": "mana" } }, { "match": { "field_2": "mari" } }],
"filter" : { "term": { "field_3": "arah" } } }
} }
### again, 'filter' is less expensive compare to 'match', as it will NOT have scoring

ref:
https://www.elastic.co/blog/lost-in-translation-boolean-operations-and-filters-in-the-bool-query